You’ve run noise reduction on a recording and now the voice sounds like it’s coming through a phone from 2003. There’s a flanging quality to it, a metallic shimmer, a hollow resonance.
The background noise is gone but the fix is now the problem. This is one of the most common outcomes from aggressive noise reduction, and almost every digital audio editor can produce it if you push it too far.
The good news: it’s not bad luck. It’s physics. And because it follows predictable rules, it has predictable solutions.
Why the Underwater Effect Happens
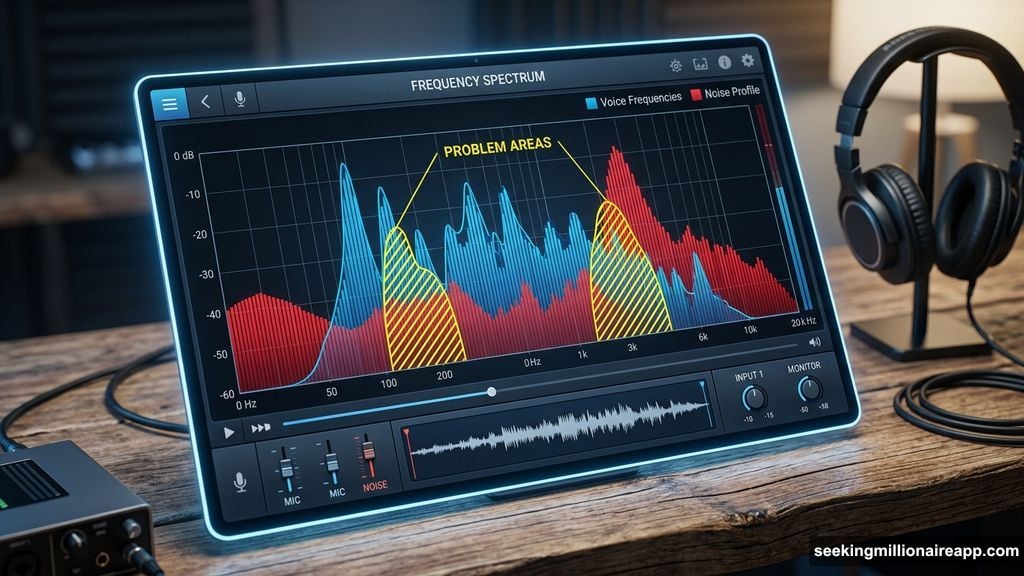
Noise reduction algorithms work by analyzing a sample of the background noise, building a frequency profile of it, and then subtracting that profile from the rest of the audio. In theory, the signal remains untouched and only the noise disappears. In practice, the signal and the noise overlap at many frequencies, and the algorithm has to make judgment calls about what counts as noise and what counts as content.
When reduction is set too high, the algorithm starts subtracting audio content it has misidentified as noise. It removes bits of the voice or instrument alongside the actual noise.
The resulting artifact sounds like flanging or phasing because the processed audio is missing the frequency components that give it its natural character. The more aggressive the reduction, the more pronounced the effect.
This is not a defect in the software. It’s the boundary condition of spectral subtraction.
Every noise reduction system has this limit. The only question is whether your settings keep
The Number One Mistake: Chasing a Silent Noise Floor
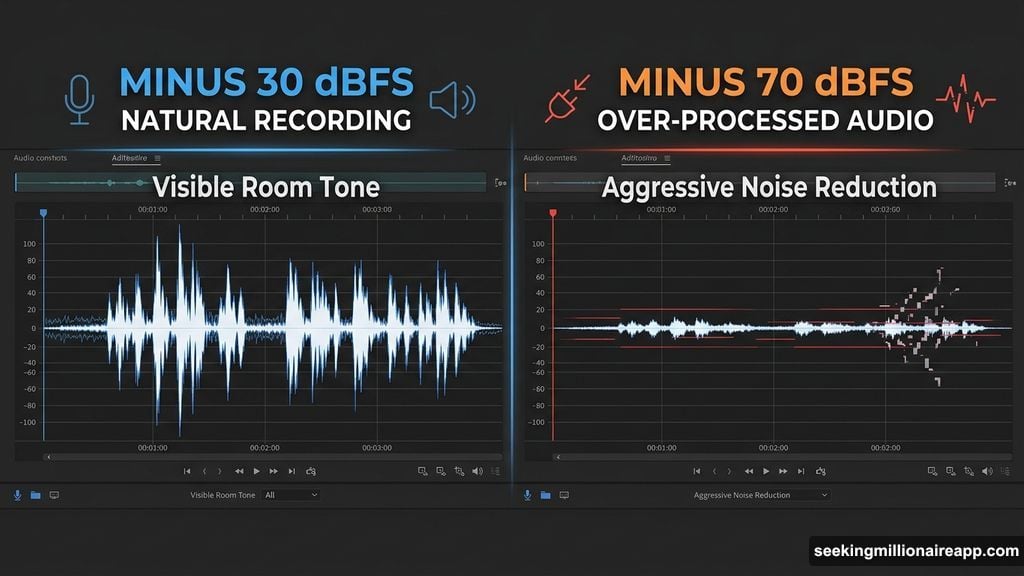
Most people approach noise reduction with the goal of eliminating all audible background noise. This is the wrong target. A recording that is aggressively processed to achieve silence sounds worse than a recording with moderate room tone left in — not louder, just worse, in the way that over-processed audio sounds distinctly processed.
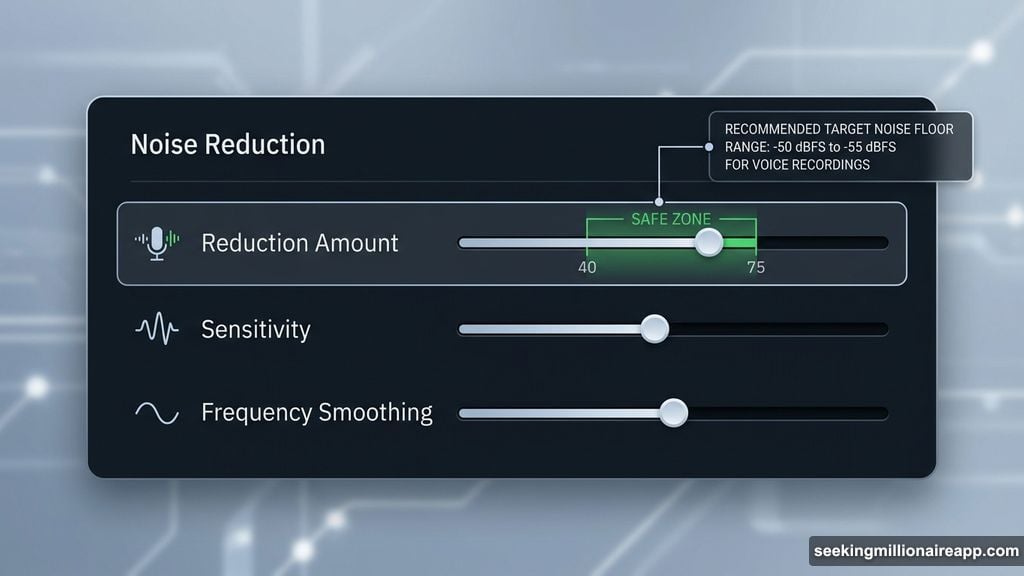
The correct target is a noise floor that doesn’t distract. Quiet enough that the listener’s attention stays on the content, not so aggressively cleaned that the processing itself becomes audible. For most voice recordings, getting the noise floor from -30 dBFS down to
-50 or -55 dBFS is enough. Trying to push it to -70 dBFS will cost you more in artifacts than it gains in cleanliness.
The Right Settings for Clean Results
Most noise reduction implementations — including the NR-2.0 suite in Sound Forge Pro — give you a reduction amount slider. The practical ceiling for artifact-free work is -12 to -16 dB per pass for most material. Beyond that, flanging starts appearing, particularly on voice recordings where the signal has transients that overlap with the noise frequency profile.
If -16 dB isn’t enough, don’t push the slider further. Run a second pass instead. Two passes at -10 dB produce noticeably cleaner results than one pass at -20 dB, because each pass uses a fresh render and the artifacts from the first pass don’t compound the way they would if you kept increasing the reduction on a single pass.
For the mode settings available in NR-2.0 specifically: Mode 3 is less aggressive than Mode
1 on the frequency edges. On voice recordings with moderate noise levels, Mode 3 at -12 dB will often produce a cleaner result than Mode 1 at the same setting. Mode 1 is the right choice only when you’re dealing with severe noise that Mode 3 can’t adequately reduce, and even then, multiple lighter passes usually sound better than one heavy one in Mode 1.
The Noise Print Matters More Than the Settings
Here’s the part most tutorials gloss over: the quality of your noise sample determines the quality of the result more than any settings you apply afterward.
A noise print taken from a section that contains even a small amount of the target signal — a faint word at the start, a note that decays into the noise, a breath before speech begins — will cause the algorithm to identify that signal content as part of the noise. It will then subtract it from everywhere in the file. You’ll end up with gaps, artifacts, or a processed quality on certain syllables or notes that you can’t explain by looking at the reduction settings.
The ideal noise print is 2 to 5 seconds of absolutely clean background — nothing but the room. Record this deliberately. At the start of every session, before you say anything or play anything, let the recording run for 10 seconds of silence. This gives you a clean noise sample to work with in post regardless of how long ago the recording was made. If you want to understand why this practice matters at the capture stage, the section on noise floor management in this recording guide for Sound Forge Pro explains what to actually set up before pressing record.
When to Use iZotope RX Instead of NR-2.0
Sound Forge Pro includes both the legacy NR-2.0 noise print system and the iZotope RX
Elements DeNoiser, and they’re not interchangeable — they’re suited for different noise types.
NR-2.0 works best on steady, consistent noise with a stable frequency profile: constant
HVAC, recording equipment hum, consistent tape hiss. The noise print captures the static profile and subtracts it cleanly. iZotope RX DeNoiser uses an adaptive approach — a Learn mode rather than a noise print — that handles noise which varies over time more effectively. If you’re dealing with HVAC that cycles on and off, outdoor ambient noise with shifting character, or any background noise that isn’t perfectly consistent throughout the recording, RX DeNoiser will generally produce cleaner results because it’s continuously updating its model of the noise rather than applying a fixed profile captured at one moment.
The full workflow for both tools, including how to use them together and what each setting actually does, is in the full noise reduction guide for Sound Forge Pro.
The One Check That Prevents Most Mistakes
Before you apply any noise reduction, preview it. Not for a second or two at the beginning of the file — preview through the quietest vocal passages, the most delicate musical phrases, the sections where the signal is most sparse and the noise is most audible. These are the sections where artifacts appear first. If you hear flanging or metallic shimmer in preview, the reduction is already too high.
Reduce the amount by 3 to 4 dB and preview again. Repeat until the preview sounds clean through the most sensitive sections. Then apply. This adds two minutes to the workflow and eliminates most of the problems that require starting over.
What Noise Reduction Can’t Do
Spectral subtraction noise reduction — the category that includes NR-2.0 and most standard noise reduction tools — works on noise that has a consistent frequency profile and doesn’t overlap too heavily with the signal. It handles room tone, HVAC hum, tape hiss, and recording equipment noise well.
It does not separate two audio signals. Music playing in the background of a recording is not noise — it’s a signal — and noise reduction algorithms cannot distinguish it from the voice.
Intermittent sounds like traffic, footsteps, or someone coughing once in the background are also beyond what this type of processing handles cleanly. For those problems, you need different tools: spectral repair (SpectraLayers or the full iZotope RX), manual editing, or re- recording.
The underwater effect is a signal that you’ve pushed past the tool’s design limits. Knowing where that limit is — and why it exists — is most of what you need to consistently avoid it.